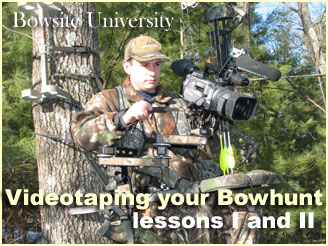
Part 1 - Shooting Field Footage
One of the most common questions we receive is: "how do you capture
video footage and photos for Bowsite.com's "Live
Hunts" ? While there is no exclusive way to do it, I decided
to put this feature together to show you the equipment we use, our
technique for capturing photos and video in the field, as well as
the software we use to get it onto the website.
The Equipment
The Setup
Techniques for shooting footage in the field
On more than one occasion we caught video footage this past season that
was priceless, heart-stopping, or just plain informational. For
instance, a terrible shot I made on a doe (see interactive
bloodtrail feature 6) simply seemed like I "blew it".
However replaying the shot through my video camera revealed that
I had actually deflected off of a branch prior to the arrow hitting
the deer. In all honesty, not only did I never see that branch,
but I never knew I hit it! The camera never lies.
|
Related
Bowsite Resources
|
|
|
|
|
|
|
|
|
In Kansas I witnessed an extraordinary scene of 8 big bucks chasing down
a hot doe. I could explain that footage to people a hundred times and
get little more than a lukewarm response. But when I played them the video
- the reaction was pure amazement. Nowadays a video camera goes with me
on nearly every hunt I go on and despite some real drawbacks to having
one - I can't imagine leaving it home.
So lets take a look at the equipment, then the techniques, and then the
software for getting it on your PC and to the web.
The Equipment
This is the gear that I use to capture both video and still photos. It's
not your normal stuff and you will need to purchase 2 and 3 from a
camera store, or on the web. All of it fits into a daypack and weighs
around 4 lbs.
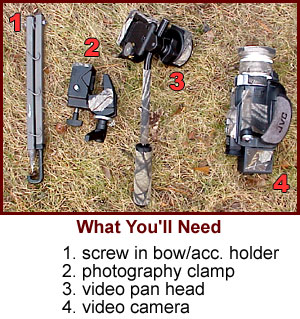
Item number 1 the
redi-reach bow holder can be used to hang calls and other stuff
from the hooks. I actually use two of these - one to hold my longbow
and the other for my camera. It's sold with a RealTree label and
costs around $15.
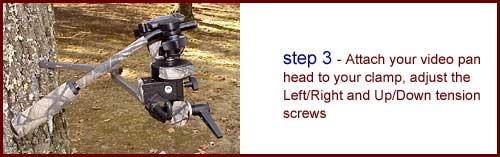
Item number 2 is a clamp made by Manfrotto which allows you to
mount high quality photographic heads to it. It retails for around $50.
Item number 3 is a Bogen
3130 Micro Fluid Head which allows left/right and up/down fluid
motion. This is critical since you may not have time to mess with
the traditional screw-knob types of tripod heads such as those that
are sold for treestand viewing equipment such as the tree-pod and
other heads. It retails around $80.
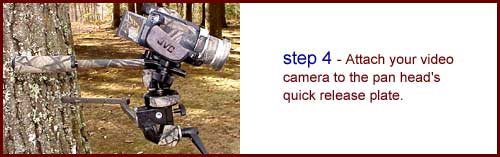
Item number 4 my video camera is a JVC
Mini-DV GRDV2000U. The Mini-DV format is critical for web applications
since you can go directly from the camera to the PC without a capture
card. I'm not going to get into all of the technical details - just
understand that you need a Mini-DV format and not the older VHS,
or 8mm formats that were popular 5-10 years ago. They suck. The
camera retails for $1500 but
I've seen them under $1000 recently and with good reason - while
the camera has great features and shoots incredible video - it is
unreliable and not sturdy enough for field work. I've never had
problems with my Sony's in the field but they don't compare on image
quality or features. My next Mini-DV Video camera will be a Canon
GL1 which is used by Dan Bertalan and other popular outdoor
video producers with excellent results.
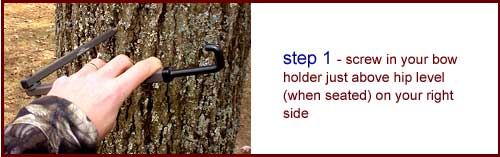
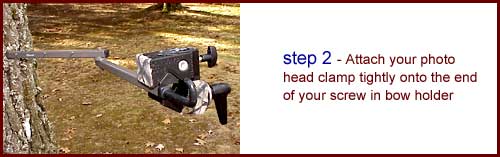
The Setup
Setup is simple and takes about 3 minutes. We suggest you practice a few
times before heading out into the field, and always take an inventory before
you leave the house, and then before you leave the truck. On many occasions
I've forgot my quick-release plate which hooks the camera to the Micro Fluid
Head (#3) and there's nothing you can do without it. Now I always keep a
spare in the truck and another in my day pack.
Techniques for shooting footage in the field
Now comes the fun part. Let's assume that you have a good understanding
of your equipment and have experience using it. So here's your first test:
It's November 10th and the ruts' heating up. A deer comes in and you fumble
around with your video camera - he's almost in range and suddenly spooks
- running back into the trees. You are still getting your video camera
in position, your bow's still on the hook and you are cursing me out for
talking you into fooling around with all this junk when you were supposed
to be hunting. Right?
Been there, done that - still doing that.
10 Tips to creating a Great Video
Tip Number 1 - you will occasionally
blow a setup by messing with a video camera. It's inevitable
when you are videoing that there is excess movement as you position
the video camera, zoom in or out, our simply reach to turn it on.
I know many hunters who absolutely refuse to bring a video camera
and there's a good reason for that.
Tip Number 2 - You can't capture everything.
Lots of action happens fast and you don't get a chance to set up.
Through experience I've learned when to simply forget about trying
to get footage. I shot two real nice bucks this season and despite
having my video camera setup for both, neither setup worked. The
first was too close (right under me and looking up) and the second
was in a rainstorm in poor light. On other occasions, when I was
on a trip and time was running out, I've opted not to take a chance
and blow a setup - so I left the camera home.
Tip Number 3 - Get the camera turned on
and positioned at the earliest possible moment. This may be when
you think you hear a deer, or when you see one coming from a great distance.
Don't worry about wasting video tape or battery power (you should have
extra of those items anyway). Get setup as early as you can so the only
movement is the smooth panning to position the deer in the frame as it
gets close.
Tip Number 4 - Stay Focused - camera
focus. Nothing is worse than autofocus on video cameras.
And typically you will be hunting the woods where there are trees
and branches in front of your subject which are constantly changing
your subjects' focus. Learn to use the manual focus on your camera
instead of the autofocus.
Tip Number 5 - Watch the deer through
the camera's viewfinder. If you watch the deer through the
viewfinder you can capture great footage and watch the deer at the
same time. Lots of greenhorns set up the camera, then look away
to watch the deer. When they go back to the viewfinder, the deer
is gone and they either have to chalk it up as a lost video opportunity,
or risk excess movement trying to find the deer again in the viewfinder.
Tip Number 6 - Pay attention to your framing.
Framing is where the deer is in the viewfinder (ultimately on the video
itself). Basic photography principals apply to video too - like the "rule
of thirds," and allowing the deer to walk into the frame when moving.
This is where your pan head will be indispensable.
Tip Number 7 - Don't zoom too close.
Especially when filming shots, you will need to time your video
perfectly. Zoom out a little when you shoot and put the deer in
the corner of the frame opposite to the direction it is moving.
The deer needs to run into the viewfinder when you shoot. The best
case is to hit the deer when it's in the left side of the frame,
facing right. When you shoot, the shot will be captured and so will
the deer running out of the frame. It takes practice, and the deer
won't always cooperate.
Tip Number 8 - After the shot, swing
the video camera to capture the escape. While the fleeing
footage is hard to get, I've caught some fleeing deer and it's actually
assisted me in trailing.
Tip Number 9 - No Expletives. I captured
some of my greatest footage of my wife shooting a Kudu in Africa.
Unfortunately we were both so excited that after she shot and the
kudu fell over, both of us yelled out "Holy **** " which
totally ruined the video for family consumption, and a future web
feature.
Tip Number 10 - Remember the hero,
and edits. Should you be lucky enough to catch yourself shooting
the next PY World Record "Typical" on film, be sure to
put your camera on a tripod and record a minute or two of you talking
with the buck. Also, take some footage of you drawing your bow,
or looking for your buck, etc. Go back and watch your footage to
be sure the audio level was OK, along with lighting and focus. Today's
cameras make this a snap and you'd be surprised at how well these
"edits" add life to an otherwise humdrum hunting video.
I once filmed a great sequence of Dave Canfield (formerly of Bowhunter
Magazine) shooting a nice mulie in Wyoming. The shot was awesome
and so was his reaction. But in our excitement we forgot to get
the "hero" footage and the video was unusable in Bowhunter
Magazine's Video Journal. A mistake I would learn a valuable lesson
from.
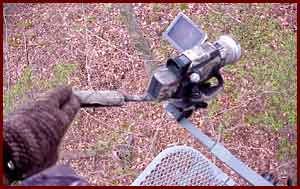
Here's how I handled a setup recently:
Behind me, I could clearly hear a deer approach through
the laurels. I looked hard to make sure that my movement
wouldn't be detected - then switched on my video camera.
Guessing which side of the stand the deer would show up,
in one smooth motion (using the handle on my Micro Fluid
Pan Head) I rotated the video camera to face off the right
side. I stood up and gently tilted the angle of the viewfinder
so I could watch the camera's screen while standing. My
zoom was already set correctly so no adjustments were
necessary there. The deer was now in sight - and 150 yards
away.
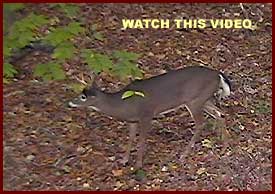
I grabbed my bow.
The camera was on standby but by watching the deer closely,
I was able to switch it to "record"
when his head was behind a tree. I had decided that this buck
was too small and I put my bow back on the hook. The buck walked
directly under my stand. At one point he looked up but was unalarmed.
My movements continued, slow and smooth. He then made 3 scrapes
on video and gave me lots of opportunities to shoot him. Eventually,
I let him just walk out of the video frame on purpose. Good
footage.
MPEG file
- 2.7mb
Windows Media File .7mb
|
Go to
Part 2 - Footage, Editing, and how to capture the video
to your PC for viewing over the web.
|