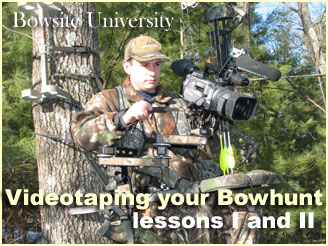
Part 2 - Editing
and Final Production of the Field Footage
In part 1, we showed you
the equipment and the setup. Now we will discuss the most important
aspects of producing a quality video, editing and production.
You have just returned from the field with footage of you shooting
a great buck. You are pumped up, and eager to show it to all your
friends. So you invite them over and begin watching the video. While
the video plays scenes of the camera zooming in and out, constantly
going out of focus then back in, and bouncing as if you shot it
on a roller coaster ride you begin to notice your audience's concentration
fading. Some guys start side conversations and the only way to get
them interested again is to constantly tell them "Shhh, here
comes the good part..." Does this sound familiar?
| Related
Bowsite Resources |
| |
| |
| |
The video of the shot was probably OK. The problem is that in order
to grab people's attention, you need to edit your footage.
Editing used to be a job for pro's. Guys like Dan Bertalan who
had sophisticated video editing equipment which was prohibitively
expensive for the hobbyist. But with the advent of Digital Video
and today's powerful PC's, even the hobbyist can produce some great
videos at home with little to no investment other than the camera,
PC, a few cables, and perhaps some additional software.
The Equipment
Here is what you will need to edit your own video footage.
|
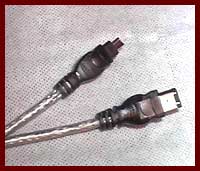
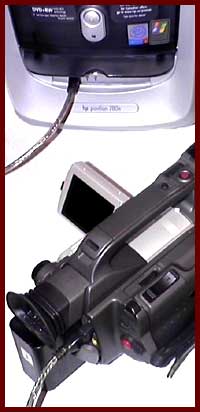
Connect your DV Camcorder
to your PC with IEEE 1394 "Firewire" Cables. Also
known as Sony iLink cables. Be sure to check to make sure
which pin configuration you have. Most cameras take the
smaller 4 pin, however PC's can be either 4 pin or 6 pin
depending on the brand.
|
- Digital Video Camera with an IEEE 1394 (Firewire connection,
sometimes called iLink)
- Firewire Cables (be sure to check the pin configuration
- some are 6 pin and some are 4 pin)
- Editing Software - I used Adobe Premiere 6.x currently
and many newer PC's come with Adobe Premier LE, or some other
video edting software provided for free with your PC.
- Optional DVD Writer where you
can create DVD's right on your PC. I currently use Sonic
DVDit Professional.
- Optional Royalty Free (RF) Music
for use with your video project. Some good sources of RF music
on the web are Musicbakery.com
, MusicLibrary.com,
or you can create your own music using tools like Acid
Pro by Sonic Foundry.
Steps to Editing and Producing your Video
Now lets look at all of the steps involved
with producing your own video using the footage you captured in
Part I.
Note: For the
purposes of this feature I am not detailing the steps
for any particular software package. We recommend that you
read the manual and familiarize yourself with the programs
you have. |
Step 1 - Laying out your project
Like any project, it is always helpful to start out with a plan.
When we go on video shoots such as our latest spring turkey hunt
in South Dakota with Stick
and String Outfitters, I had a shoot plan laid out ahead of
time. This may be nothing more than a simple checklist of shots
needed to make the video interesting. You can type these up on one
sheet of paper and take it with you in the field. For my Spring
Turkey hunt, my list looked like this:
- Greeting the outfitter at the beginning
of the trip
- Riding to the hunting area at dawn
- Getting video of roosted birds
- Setting up (assuming there is available
light)
- Footage of turkeys
- The Shot
- The "Hero Footage" - try several
takes of varying length. Less than 1 minute is best.
- Go back in the blind and film these edits
- Guide Calling
- Me and guide looking out the window
- Getting ready for the shot
- Drawing and shooting
- Reaction footage - like a high-five,
fist pump, etc.
- Ending Scene - such as walking back with
the bird, driving off, looking into the distance, etc.
While to many, this may seem disingenuous and painfully "contrived"
- I think of it as bringing to my audience the entire story. We
try to simply recreate the situation as close as possible to reality.
For many, these "staged" events can make you feel uncomfortable
at the moment. After all, how many of us are Tom Cruise, but the
reality is that all good video must included these elements in order
to keep your audience interested and engaged with the story.
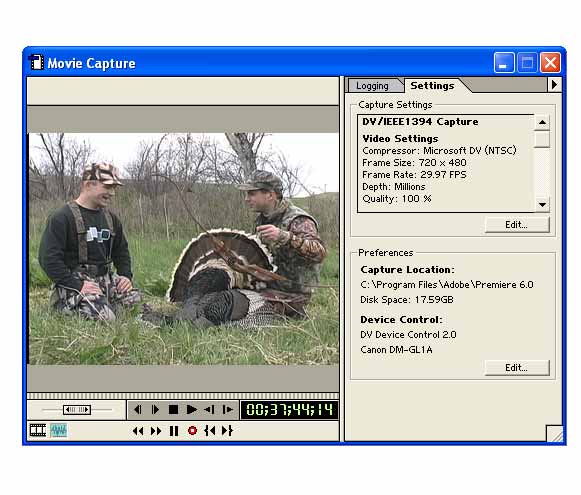
Step 2 - Capturing my footage to the PC
Capturing is done through software which exists on your PC. For
my setup I use Adobe
Premiere 6.x which has built in capture software (see screen
below). Using your Firewire Cable, simply plug one end into your
camera, and the other into your PC. Most current software packages
such as Windows XP, and Windows 2000 should automatically recognize
your camera. If it does not, I would strongly recommend that you
upgrade your PC's operating system. You may have the option of installing
"drivers" for your current PC's Operating Systems (e.g..
Windows98 or Windows95) but it may be easier just to upgrade.
When I am ready to edit, I pull up my shoot list and spend 20-40
minutes going through my tapes, jotting down the time codes for
these edits. For instance, "Hero Footage" would follow
with something like 35:50 - 41:25. This means that I need to FF
the tape until it reads 35 minutes and 50 seconds. Then I can "CAPTURE"
this clip on my PC. The clip is then labeled as "the shot"
and I continue capturing the additional edits.
Step 3 - Assembling the Video
To this point, you have all of your edits captured and organized
within your Video Edting Software program. Now its time to lay out
the video. Most video editing programs use a "Timeline"
which is a matrix of tracks or layers represented Horizontally,
and Time (usually in seconds) represented vertically (see below
screen shot).
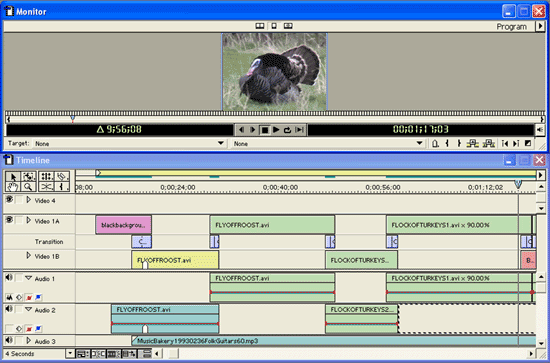
Screen
shot of Adobe Premier 6.x Timeline during Turkey bowhunt Editing
Session
You will need to "trim" each segment of video so that
it starts and ends smoothly. Then you simply lay out these segments
along the timeline until you are at the end. Editing takes practice
and don't expect your first projects to look like a RealTree video.
But with practice you will get the hang of it. As you progress,
consider experimenting with these additional techniques
- Adding a soundtrack or mood music
- Picture in Picture
- Slow Motion
- Transitions, like fades from one scene to another, fades to
black or white, etc.
- Title overlays where you can introduce a character, or place
- Inserting photos or graphics, etc.
All editing programs that I am familiar with allow you to preview
your video prior to the final creation (which is called rendering,
or exporting). This is invaluable since you will likely make a lot
of changes to your video before it is complete.
Step 4 - Completing the Video
You are proud of your new video project but unfortunately to this
point, the only people that can see it are the ones standing in
front of your computer. You need to somehow get this video to a
VHS Tape, CD, DVD, or the Web. Let's look at each one of these mediums
and how you might go about doing this.
VHS Tape - This is the most common medium for
showing off your hunt. It is cheap, and virtually everyone has
a VHS player. Depending on your editing program, you may have
an option called "export to tape" If you do not have
this option, then you should consider purchasing a product like
Adobe Premiere 6.x which does have this option. You simply put
a blank tape into your Mini-DV camcorder, put it on record, and
then your video editing software should do the rest. This will
make an exact copy of your PC project onto your Camera's Mini-DV
tape. Once that is complete, then attach your Mini-DV camera to
your VCR, hit Record on your VCR and Play on your Camera. This
will copy your video project to VHS tape. Note: your camera should
have the proper cables for playback on your VCR. They usually
consist of a single AV connector on your camera, and 2 or 3 colored
cable jacks which go into your VCR.
CD Rom - There are two things necessary to move
your video files to CD Rom. The first is a CD Writer. The second
is enough space on your blank CD to hold the video file. Video
files are HUGE. And since CD's only hold 650MB of data, it is
important to ensure that your video project is less than 650 MB.
DVD - DVD is an outstanding way to show off
your video. You should be able to fit approximately 2 hours worth
of video on a standard single-sided DVD. The first thing you will
need is a DVD writer. There are various, competing standards on
the market at present but the one I use, and appears to be the
emerging leader in the standards race is DVD+RW. The DVD's are
presently about $8 each and you can re-use the DVD+RW's if you
choose. Using a program such as DVD'it or MYDVD you can easily
create the DVD menus and buttons similar to a professional DVD.
WEB - Till now, choosing the medium was relatively
straightforward. But with the WEB, things get complicated quickly.
There are a number of choices you will need to make, each has
its own set of issues. Here are some of the questions you will
need to answer:
- Where will I store this video?
- unless you have a hosted website, or a site which allows free
hosting of pictures and video clips, you will have no way to
"present" these videos to people unless you send the
clip via e-mail and I strongly recommend AGAINST
that.
- What format should I use?
- There are a variety of different computer formats, here are
the pros and cons of each:
| Video Format |
Extension |
Pros |
Cons |
| MPEG* |
.mpg |
Universal browser support,
good quality |
Extremely large, does
not stream, large picture size requires powerful PC |
| QuickTime |
.mov |
Weak browser support, OK quality |
Medium size, many people have difficulty
viewing .MOV files |
| Windows
Media |
.wmv |
Good browser support for Windows
only, good quality |
Medium size, streams with or without
a server, requires semi-powerful machine |
| RealMedia |
.ram |
OK browser support, good quality |
Requires a RealVideo server, not
suited for hobbyists |
If you
do not have one of these players, click the links to download
them. *MPEG videos can be played on most browsers without
any additional players. If your browser can not support MPEG
movies, then download the WindowsMedia player which can play
many different formats including MPEG and WindowsMedia
- Who is my target audience and
what connection do they have? - this is critical.
Many companies try to produce a video for the web that virtually
no one watches. That is because the file size is prohibitively
large for their target audience. Video files are HUGE. A one minute
MPEG clip that is 2 inches wide can be as much as 8mb. If you
are on a high-speed internet connection such as DSL, Cable, or
through your employer's T1 line, then this is probably ok. But
if you are on a dial-up modem then it's hardly worth the effort
to watch unless it is something extraordinary. At Bowsite.com
we are moving quickly into the streaming video space however we
have decided to target the growing number of Broadband (high speed
internet) users rather than the dial-up population. It's one of
those harsh realities of the internet; dial-up connections are
too slow for even lower-quality video. I'm not sure about you,
but my time is too valuable to sit around for 20 minutes to watch
a fuzzy video clip the size of a postage stamp.
Assuming you have chosen the desired format, getting your video
from your editing program to this format should be relatively simple.
Adobe Premier comes with a variety of export formats, such as MPEG
and Windows Media. If you are really interested in exporting to
the web and you need a lot of flexibility, then consider a product
called Cleaner5
which is designed to port your video projects into virtually any
web format easily.
Well, there you have it. I realize that we threw a lot of information
at you in Part 2. Video editing takes time to master but I am confident
that with some basic computer skills, and the right software, you
too can produce some great videos of your hunts. We'd love to see
them too, and possibly include them on a new project we are working
on, please contact us if you would like to submit your video clip
to Bowsite.com.
|
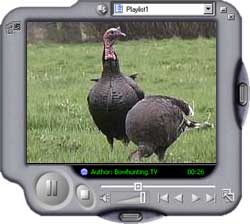
| Watch a sample from
our upcoming DVD which includes the turkey hunt we edited
using the techniques above. The 1 minute clip includes
the following: |
-
fades from black
- Logos
- Title Badge
- RF Music
- Slow Motion
|
|
File
Size 2.2mb, Duration 1:20, Requires Windows Media
Player |
|
|