So here we are back from the field. You have your deer footage, your kill shot, and your edits perfectly recorded with outstanding audio. Your tag is filled and you find yourself with days on end of free time. Well kiss that free time goodbye because we are about to begin what some people consider the fun part of the journey, while others consider it more painful than watching Oprah - and that is editing.
Now I must write this disclaimer up front. Unlike the previous lessons on how to shoot, focus, tips, hero shots, etc. – which are basically universal and generic. Editing is the opposite. There are dozens of editing programs available. Some of them are complex and designed for the guys who brought you Lord of the Rings. Others are geared more for “prosumers” while others come free with your PC and will automatically create a mix of music and video clips which are great if you are showing your 8pt kill shot on MTV. My point is, there is a huge range of editing programs available and the decision on which one you use is a function of how much you want to spend and what you are trying to accomplish.
Since there is such a disparity among editing programs (and DVD burners), it is impossible for me to step you through the programs itself. I could spend days writing instructions on a program that nobody has installed on their PC. So for the purposes of this final lesson, I will be discussing the more universal aspects of these programs at a high level. I will also be using my favorite programs only because that is what I have available to me at this time.
When I first started out the most difficult thing for me to figure out was how to get the footage out of the camera and into the PC. Now, that was eight years ago before Windows XP, plug and play, and mature standards. Today, it is much easier but still confusing for many people. So let’s take a moment to discuss the basic process of getting your footage into the PC. Note, some cameras and software packages may be different so always read the manual or ask for technical assistance from your cam manufacturer or a local teenager.
Capture Components:
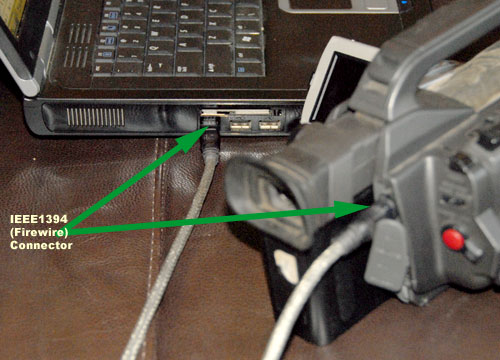
- Video Camera
- PC
- IEEE1394 Cable (also called Firewire)
Sequence for Editing
- Turn on your Video Camera and place in VCR (or VTR) mode.
- Turn on your Editing Software
- Plug in your Firewire Cable to the Camera and the PC (XP should display a prompt that your cam has been connected)
- Start your capture software within the Editing program
- Use the VCR-Like Controls to play, record, pause, FF and RW. This should control your video camera at the same time.
- Get to the spot on the tape you wish to capture, then hit Record (Play then record on some packages).
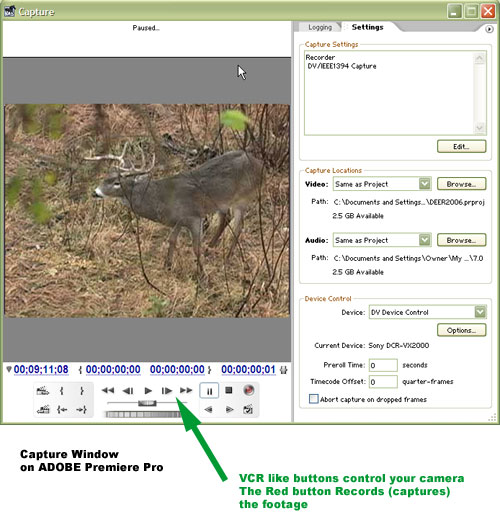
This will create either an .AVI file, a .MOV file, or a .MPG file on your hard drive. This clip should be named to reflect the footage, like Novemberbuck1.avi and that file is what you will import into your asset folder on your editing program.
If you’ve bought a PC in the last 3 years, chances are it has come with some kind of video editing ‘lite’ version on it. If not, then you might be in the market for one.
All editing programs perform basically the same way. They contain these general characteristics:
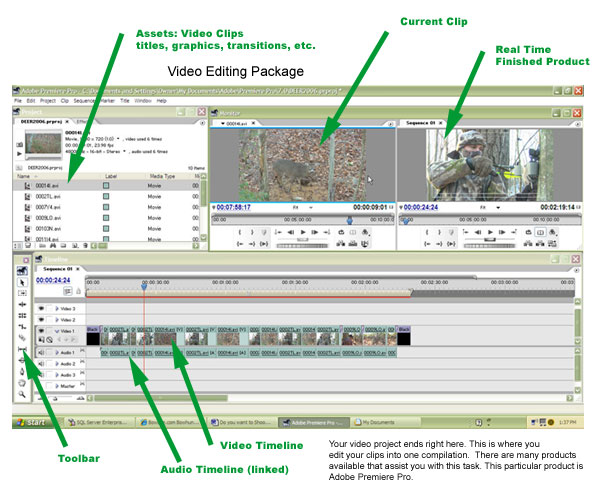
Universal Features
- Asset Folder – Assets are just that. All of the clips, music, audio tracks, titles, still photos, and effects which when put together create your final video production. You typically import these assets into the folder by dragging and dropping, doing a direct capture from the camera, or some other method used by your editing program.
- Timeline – this is where clips are spliced together. The timeline represents a continuous horizontal plane, which runs from left to right. Moving to the right represents the progression of time on the video. Also, the timeline typically has multiple rows also called “layers.” You can edit everything on a single layer but if you wanted to display a title on top of the original clip it is much easier to add it to a layer above the base track and make it transparent. Timelines (layers) are grouped by priority. The higher highest layer displays on top of all the lower layers. So for most editing programs, timelines are 3-Dimensional. On many programs, the timeline contains both a video timeline and an audio timeline. On my particular program, the audio timeline is automatically linked to it’s video timeline. I then have the option of unlinking them when I need to omit audio for whatever reason.
- Toolbar – This is where you find basic editing tools. For instance, the RAZOR tool allows you to cut (divide) a clip on the timeline down to an individual frame level. The ARROW allows me to grab and move the timeline and the MAGNIFYING GLASS allows me to zoom a portion of the timeline. I use the ARROW and RAZOR 99% of the time.
- Monitor or Viewer - On my program this is divided into two windows side by side. One plays the current clip and the other shows a real-time version of my timeline. On my editing program I can actually see the finished product as it is evolving on my right viewer window. Without this ability, I would be lost.
Price of Editing Programs
Generally speaking, most worthwhile editing programs run between $400-$800 dollars. The $50-$200 programs are geared for kids and people looking to play around with video editing but they should not be discounted if you are just starting out. Just about everyone (including me) started with a low cost editing program and then upgraded. The $1000+ programs are for the pros and typically contain such a steep learning curve that they are frustrating for all but the guys who do this stuff for a living.
Laying your hunting video to audio tracks is a fun way to familiarize yourself to the editing process. One of the first things I did before I got seriously into video was to pick one of my favorite all time songs, lay it down as a soundtrack, and then lay video clips which were timed to that song. It was fun to show to my friends and family and it led to the creation of Beyond Adrenaline which is styled much the same way with soundtrack which moves the entire DVD along. How to lay tracks to music is an advanced technique outside of the scope of this lesson. However with practice it can dramatically improve your video footage. Imagine what the movie Forrest Gump would be like without the soundtrack? Download a cool song from ITUNES and use it to create a 4-minute compilation of your hunting footage from the year. You’ll be surprised how neat this project is.
Ok. We’ve got the clips, captured them to our editing program, and produced a finished product that looks great on the PC and your girlfriend now looks at you like Jude Law. It’s time to get that puppy on your Television set and thanks to modern technology; this last step is pretty easy.
There are probably more DVD burner software packages out there than there are video editing packages. Every PC shipping with a DVD burner now comes with a burning package installed. For the novice, there is little reason to go out and purchase one unless your PC did not include it – but that is rare. If you must buy one, determine what your needs are first before spending a lot of money. The package I use is Adobe Encore, however that is an advanced package and since I sell DVDs it was a worthwhile investment. However, for most people, it is overkill.
In my opinion, there are two types of DVD burner packages. The kind that will create a menu, and the kind that does not. For the purposes of this article let’s just keep it simple and create a DVD that has no menus and just auto-starts when you put it in your DVD player. But first, there are some things you need to know.
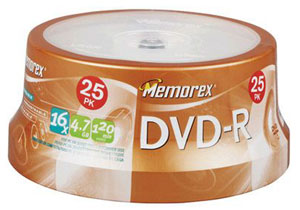
DVD Formats Thanks to our Free Enterprise system when DVD burners were first introduced to the market the manufacturers all decided to create their own standard. What that meant to us is that instead of having to keep track of one media type you now get to choose from several including DVD-R, DVD-RW, DVD+R, DVD-RAM, etc. Just match up your PC’s burner with the media and you’ll be fine.
Here’s what you’ll need to Get your creation on TV.
- A final produced video file (typically an AVI file, however it could be .MOV of .MPG file)
- A blank ‘writable’ DVD
- A DVD burner package
Depending on your software package, you simply import you final video file to your DVD burner package and then follow the instructions to create the DVD. This BURN process can take from a few moments to several hours depending on how large your video file is. For a 2 hour video, expect to let it sit overnight and keep your fingers crossed, lots of things can go wrong in those few hours but more than likely it will be that your PC runs out of resources like memory or disk space during the process. I learned the hard way in the beginning and threw out a lot of incomplete DVD’s before finding the right PC, software and burner which worked every time. Since then, I treat the burning process like going to the dentist. It’s rarely pleasant but always necessary.
I often tell people that carrying a video camera during my hunts is like having 10 buck tags in my pocket. The same thrill you experience by killing that big buck is found when you capture that incredible buck on film. I’ve filmed things that I will watch with my great grandkids long after those hunts are a distant memory. Far greater than any mount on your wall, the video footage you shoot will put you, your kids and your friends there with you to experience over and over again.
Video has dramatically changed bowhunting – much of it for the better. Imagine where Fred Bear would be if nobody ever brought his feats to the screen? Imagine how many of us were inspired by those short films forty years ago? But unlike the seventies, the ability to capture great footage and bring it to others is cheap and readily available to everyone now thanks to digital cameras, computers and digital media like DVDs. Now you are limited only by your imagination and desire to put the extra effort and hassle of dealing with a video camera in the field. To me, it’s only been a minor inconvenience and that is quickly forgotten when I have my buddies over to show them footage of a lion, caribou, or trophy whitetail.
We hope you enjoyed this presentation on Video Editing. It was a lot of work but something we enjoyed bringing to you.
Good Hunting !
This photo was taken after filming what many people consider the best hunting video ever captured and it was completely by accident. It is called the World’s Greatest Tracker and is featured on Beyond Adrenaline !