How to shoot and film simultaneously
Preparing for the shot
Before you ever see your first animal you need to identify a few critical components of the shot composition.
- Shot Timing
- How close to zoom
- Distance to game trail, waterhole, bait, etc.
- Which direction the animal will approach from
- Whether you wish to capture the approaching footage or just the shot
- Exit Routes
Shot Timing – I always plan for a quartering away bowshot on video. I prefer to have the animal walk past me before I shoot. In Lesson 3 you learned how to predict the shot scene and ways to set up your camera for that. In this lesson we need to focus on the actual scene and ways to capture properly framed footage. On tight shots, this is not always possible. In most cases, you need to identify far left and far right landmarks within the composed frame – then choose a mid-point. From there, you will time your shot so the animal is just about approaching the midpoint of your frame when you smoke him.
Zooming – There is a direct, inverse relationship between quality of shot and ability to capture the shot. A tightly zoomed animal is much more compelling footage. However, the breathing room for making the actual bowshot will decrease the closer you zoom in. This is covered in depth below in framing the shot.
Distance to Game Trail and Other Clues – One of the most important aspects of your video is to visualize your video shot, and bowshot scenario before anything shows up. I do this every time I am in a new area by talking with the outfitter, other hunters, or simply by identifying sign like game trails, rubs and scrapes. On some hunts this is simple, like if you are hunting over bait, or hunting a waterhole. If you know exactly where the animal will be, put your camera on MANUAL FOCUS and focus on an object, like a stick or bush, next to the spot the animal will be standing.
Approaching Direction – if you know the animal approaches from the west, you may want to pick your stand location to video the approach. I try to put a tree between my camera and the approaching animal. This cuts down on its ability to detect necessary movements. This is critical if you are not experienced or you do not have a remote unit. Deciding to capture the approaching footage is up to you. Capturing the bowshot is certainly the objective, but if you want a compelling footage (which tells a story) you will need to get more than the kill.
Exit Routes – Identifying exit routes ahead of time is helpful. After you’ve shot, try to film the animal running off. Film his last moments if possible. A lot of hunting videos pan back to the shooter to catch the reaction. This is great if you have a dedicated cameraman, but most people won’t so just film the drop scene if you can get it. This can all be edited out later if you choose and you can even edit in a reaction shot later if you wish to.
When you see the animal approaching
As the animal approaches, I go through the following sequence:
1. Camera On (use remote if you have one)
2. RECORD
3. Confirm RECORD on viewfinder
4. Fine Tune Zoom Setup (using a remote) (Focus – optional and advanced)
5. Identify movement opportunities (did the animal walk behind something)
6. Smooth motion panning
7. Moving the frame to the likely shot area and leaving it there
8. Reaching for my bow
9. Final fine tune of camera
10. Drawing and shooting animal
11. Moving camera onto animal to capture fleeing or final moments
|
The key to successful filming is understanding what you can get away with, and when, then timing the sequence of events. This is not easy. It will come with experience and you will mess up lots of opportunities before you get comfortable with it.
Practice on Does. Unless you are in a hot spot during the peak of the rut, you might try practicing the sequence on does or dink bucks you have no intention of shooting. This includes actually filming the sequence readying your bow, and drawing on the animal. When you are ready to shoot, make an urp sound. That will be captured by your camera's mic and allows you to review your timing and framing later. If the deer is perfectly framed and zoomed, and you hear an URP when she is just approaching midpoint - you are ready to shoot for real. This allows you to practice your timing – which is critical. The goal is to get to the point where you can tell yourself “shoot” when the deer is at midpoint, all the while keeping 100% focused on making a clean, deadly shot.
Note: None of the footage is useable if you wound the animal. I consider it irresponsible to be so focused on videoing that you shoot poorly because of the distraction. A clean kill is always the top priority – everything else is secondary.
How to frame the shot - balancing the highest probability of capture with the best quality of footage
Safe Zone and Rule of Thirds - One of the most basic principles in all photography (including print and video) is the rule of thirds. A subject within a photograph is not nearly as compelling when it is dead center. For hunting video I use a combination of thirds and a safe zone to capture my shot. See the diagram below.
In the above diagram, if the deer was walking left to right, I would be drawn in the unsafe zone but would not shoot until it hit the left third line. The deer will be facing the right side of the frame and will run through the larger balance of the frame. The opposite would be true if he were approaching from the right to the left.
Zooming - As mentioned earlier, compelling footage is important to the value of your video. A deer that is lost in the frame will be nice, but not compelling. However, the correlation between zooming for footage quality, and precision timing is direct. As the zoom gets closer, precision timing intensifies. There is little you can do during editing to correct poor filming – timing and setup must be practiced.
Watch This Video Clip
Watch this shot which is zoomed WAY too close
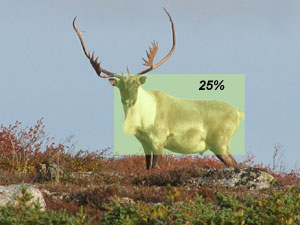
I prefer the animal to be 20-25% of the frame. Anything higher than that is very risky for all but bait, or waterhole shots and probably unnecessary. Anything less than that and the footage suffers because the animal appears small, lacks detail, and gets lost in the frame.
Here is a simple table to illustrate recommended compositions:
Shot Scene |
Animal in % of Frame |
Scene |
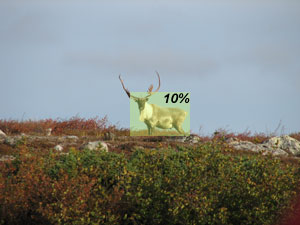
Passing Shots |
10-15% |
|
Baited& Waterhole Setups |
25% |
|
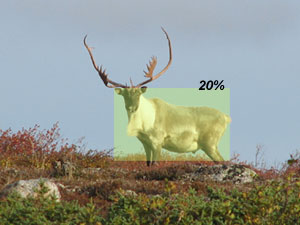
Stalking Shots |
20% |
|
Ways to optimize your chances
Where legal, and appropriate, these scenarios greatly increase your ability to film your bowhunts.
Baiting – personal ethical considerations aside, there is no better way to film a game animal being shot than over bait. Unlike any other methods including waterholes, you can predict the action and get everything set up ahead of time to capture your shot. A bait pile allows you to set your focus, zoom and position of your camera prior to the action. You know exactly where the actual shot will be and you can prepare for it. The downside to a baiting scene – in my opinion – is the bait pile itself. Many feel that shooting an animal with its head down feeding in one spot lacks a truly wild feel for the footage. Still others may feel that the footage is a turn-off because they are philosophically opposed to baiting. All of these factors need to be weighed against the objectives for the footage. For example, if I am filming something for TV or for a DVD, I will not include a bait pile in the footage. If I am filming for a Bowsite.com Interactive blood trail during a cull hunt, I may not give it a second thought.
Waterholes – Next to baiting, a waterhole is the 2nd best scenario for videoing and my personal favorite. It is also less controversial than baiting so it makes a terrific video setup. While you may not be able to pinpoint the action like you can on a bait pile, the area where the action will be is still pre-determined. This allows you to get close enough with your setup to capture the shot. The animal should also give you enough time to get everything framed correctly before you shoot.
Ground blinds – I like filming from ground blinds - simply because you can get away with a lot more movement in a ground blind than you could in a tree stand. It also allows you to make dramatic movements, like moving your entire tripod/camera behind the protection of the blind. You can’t make dramatic movements like that from a tree stand without significant risk of getting busted.
Decoys – I have had poor results with deer decoys but in areas where they work well, they can assist with influencing where the action will occur. It is not nearly as effective as baiting and waterholes, but it does help. If you are hunting turkey from a blind, they are a big help.
Lesson 5 - Post-Shot Edits and Supporting Footage
|