Here at Bowsite University we are focusing on gear that is neither entry-level, Wal-Mart quality, nor is it Panavision either. We are bringing you the equipment we use every season (up till 2006 anyway) and the supporting gear. Your objectives and budget will dictate your equipment choices which will vary widely from hunter to hunter. The equipment we used represents what we feel is the best balance between cost and quality. The output is also readily compatible with most common PC equipment in use today.
 |
| Essential Gear – Top: Sony VX2100 with attached Sennheiser Shotgun Mic and LANC remote control device. Bottom: HunterCam Cradle HD video arm. |
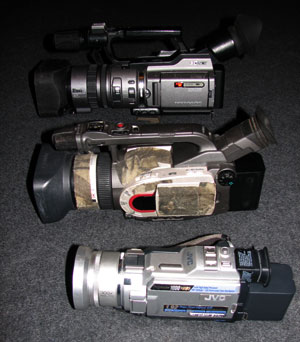 |
Cameras: Top: Sony VX2100, Canon GL1, JVC cheap 1-chip. |
My general advice to people starting out is simple: get a new, 3-CCD camera (explained later) that is nearing the end of its life cycle. For instance, the Canon GL2 is still for sale; however it is due for a major upgrade. So you can find a new GL2 for about 1/3 what the pros paid for them 3 years ago. Since I am writing this article in 2006, and you may be reading it later than that – the same concept would apply only with a different model. A 3-chip camera will provide footage that is good enough for standard definition television. It is also well suited for a marketable DVD. Our first video, Beyond Adrenaline was shot entirely on a Canon GL1 & GL2, along with a Sony VX2100 Standard Definition Camera. They are relatively small, portable, and versatile. They have features that I find essential and not typically found on the cheaper $400 cams. The essential features are:
· LANC Connection port – used for remote control devices
· Manual Focus – absolutely critical for preventing auto-focus Hell
· White Balance – the remarkable feature nobody but pros know about
· Optical Zoom – the only zoom setting you should use
· Remote Mic Ports – allows for use of a shotgun microphone
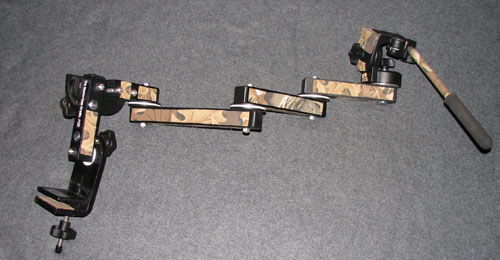 |
HunterCam Cradle HD Video Arm – My all-time favorite. |
For those of you who recall my first bracket, and perhaps went out and purchased that setup, I must apologize up front for leading you down a path to eternal frustration. There were only a few brackets around several years ago but they basically all sucked, and my inexpensive setup worked fine for stationary use. But technology, driven by consumer demand, has created some awesome new brackets for small and medium cameras like the ones I’ve recommended above. And those are the ones you should use now.
I have tried lots of brackets in the last few years. However one bracket has remained my all time favorite and it’s basically all that I use to this day. I swear by this bracket and have yet to find a better one. It is called the HunterCam Cradle available at huntercamcradle.com.
The thing I like about this arm is that I can mount a fluid head (for smooth motion) and I can attach the bracket several different ways to the stand. It also has a tree-mounting system, which extends the arm further if you need it, and does not require any mounting to the treestand. It is not cheap, but it is as important to your setup as the camera itself.
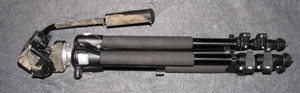 |
My Bogen/Manfrotto Tripod with a Bogen Fluid Head |
This is one piece of equipment where you can probably save some money. While I use a very expensive, and professional video tripod, you can get away with a less expensive tripod if you wish. Again, it depends on your objectives. If you do all of your hunting from the ground, then you will probably want a good quality tripod. If you are only going to use the tripod to film stationary shots like hero footage or edits, then you can go cheap. My basic rule applies – buy the best you can afford.
For my setup I use a Bogen/Manfrotto Carbon Fiber tripod with a Bogen Fluid Head. Incidentally, you can use the same Fluid head for both your tripod and your Video arm to save money. Just don’t forget to bring the fluid head when you grab your tripod to go turkey hunting (I know from experience L).
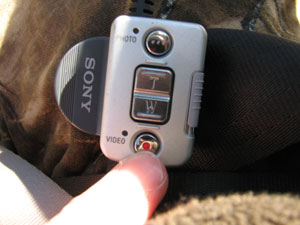 |
LANC Remote Device - Don't leave home without it. This little device will minimize movement and make you more flexible. |
If there is one thing I learned after hundreds of videotaped hunts, it’s to learn how to use a remote control device, also called a LANC remote.
The LANC remote clips onto your tripod arm, pant leg, Summit SOP harness, etc. and connects to the LANC port on your camera with a 3-4’ black wire. With this device you can do the following functions on your “Prosumer” camera:
- Turn On / Turn Off
- Pause / Record
- Zoom in and Zoom out
- Take a Digital Photo
- Operate your Manual Focus*
- Operate your Iris / Gain settings*
*Limited cameras and remotes have this capability
The reason the remote is so vital is because you significantly reduce movement in the presence of game. I never have to touch my camera for any reason other than to frame the shot. So as that big buck approaches, I simply touch buttons that are strategically placed close to my resting hand. It is a Godsend for anyone who has ever had to fumble with those little tiny buttons when that trophy buck is approaching.
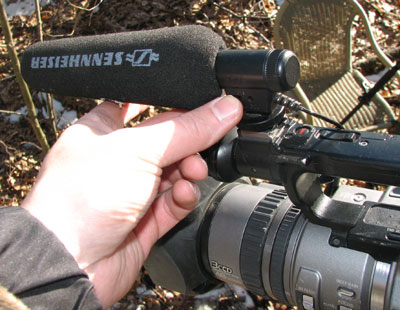 |
Without quality audio, your footage is flat and annoying. An inexpensive shotgun mic eliminates extraneous sounds and focuses your audio downrange where you want it. |
Even the best footage sucks without quality audio. And even the best cameras on the market include Mics, which were never designed for hunting our outdoor use. A shotgun microphone targets the sound in the direction it is pointing. So mine is always mounted on the camera facing the action. It magnifies the downrange sound and all but eliminates sounds from behind, or to the sides of the mic. The shot impact is loud and dramatic, and you will hear every grunt, gobble or footstep you capturing on film.
Shotgun Mics are not huge money. I use a Sennheiser MKE300, which retails around $170.
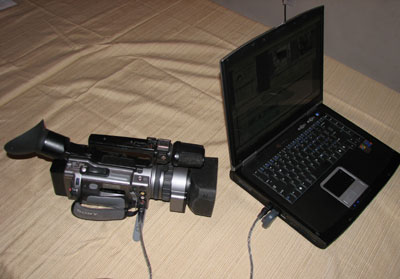 |
Your editing system is at your fingertips right now. Most home PCs will work just fine. |
I know it’s not used in the field but it’s important nonetheless. After you’ve captured that awesome shot on film, filmed some edits, and now wish to create your final work – it’s time for editing and burning. The good news is that for almost all-standard definition video, the PC you are reading this feature on is very likely capable of editing and producing the final media. We will save the details for a later part of this feature, but for now all you need is a PC, a DVD burner which may very well be part of your PC, and editing software. I have listed what I consider a minimum PC configuration:
PC with a Pentium Processor of at least 1.3 GHZ.
500mb of RAM (memory)
80GB Hard Drive
Conclusion - If your budget allows, buy a 3-CCD "Prosumer" video camera, a high quality video arm, a shotgun Mic and a Remote Controller.
Lesson 3 - Your field Setup.
|