
 With
Dr. Mark Timney
With
Dr. Mark Timney
About a year ago I wrote a column about developing a perfect release. Now, it’s time to work on the other hand. How you grip the bow can have a profound effect upon accuracy.
What I’m going to present here about ‘gripping’ may seem strange, and even against what you’ve been taught, but it’s based upon the teachings of several world-class archery coaches.
Don’t Shake Hands!
A majority of archers want to ‘shake hands’ with the bow when they grip it. Holding the bow like this is wrong for two reasons:
1) It puts your hand off-center with the grip, which is likely to result in your twisting the bow (torqueing) at the moment of the release; and
2) It’s more likely to result in your grasping the bow tightly and/or catching its forward movement while the arrow is being released, both of which can also lead to torque/twisting.
Don’t reach for the grip as if you were going to shake hands with it. Instead, start with your hand perpendicular to the ground and then turn it clockwise (for right handed archers) about 20-35 degrees. Next, lift your fingers sightly toward the sky and let the grip fall into the natural ‘pocket’ that’s been formed in your palm. (See PHOTO A)
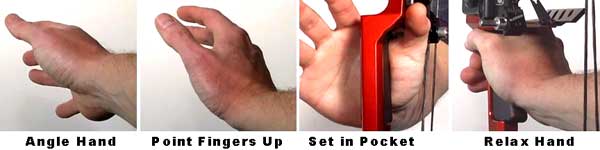
If you can’t feel the pocket right away, it’s probably because you’re forcing your fingers open. This causes the muscles in your palm to become hard. This makes the natural pocket--the gap formed by the hand’s muscles and bones--dissappear. Once your fingers are around the bow you have to let your hand and fingers be as relaxed as possible to let the pocket form. Just let them hang as they will. More on this later... as you don’t want the bow jumping out of your hand at the shot.
The Consistency of the Low Wrist
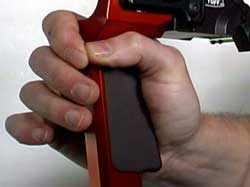
It used to be that archers were taught to use a high or medium-wrist grip when holding the bow, but if the grip on your bow will allow it you should hold a low wrist (See PHOTO B). Medium and high-wrist grips were thought to be superior because they resulted in less hand contact with the bow. The assumption was "less hand contact equals less possibility of torque."
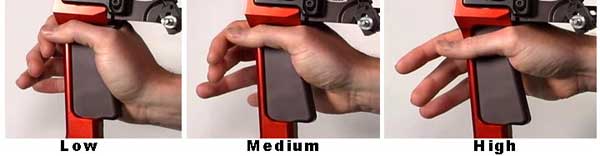
While there is something to this line of thinking, a low wrist is much more ‘repeatable’ than a high or medium wrist. It’s much easier to feel you’ve got your hand on the bow the same way every time with a low-wrist grip. The lo-wrist grip, combined with a tilted hand, aligns the grip in the ‘pocket’ of your palm. And if you’ve got the grip in the ‘pocket,’ you shouldn’t have to worry about torque because this is a very neutral way to hold the bow.
High and medium-wrist grips require you to place your hand at specific angle on grip every time without the benefit of having the ‘feel’ of your hand along the bottom half of the grip. Repeating this angle is difficult shot after shot. And if you don’t repeat it, you will have arrows hitting high and low because you’re changing the vertical pressure you’re exerting on the bow with each shot.
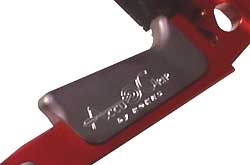
Grips like those found on Mathews bows can make shooting a low wrist grip very difficult. The little bump in the middle of the stock grip can cause the bow to twist in your hand at the moment of the shot. I learned to shoot Mathews grips with a medium wrist, but I wasn’t as accurate that way. So, I switched to another grip. (See PHOTO C.) I’ve noticed a good number of Mathews Pro shooters have done the same thing.
A wide grip can also make it difficult to hold a bow the same way every time. There’s too much wood to fit into your hand’s pocket. Additionally, highly non-clip grips are also bad news. You don’t want your hand to stick to the grip... more like let the grip slip into your hand.
If you have a wide or sticky grip, or one that’s not suitable for shooting a low wrist, you can easily modify it with a file and sandpaper, or purchase an aftermarket grip. If you have a Mathews bow, I would suggest looking at the Rokes Accu-Grip advertised here in the ‘classifieds’ section of the BOWSITE. I helped develop the grip and am convinced it’s the most torque-free grip available for Mathews bows.
Let the Bow Jump!
One bad habit that many archers have is catching the bow at the moment of the shot. You don’t want to do that. You should let the bow jump forward out of your hand. You’re less likely to torque the bow this way, especially if you anticipate when the shot is going off.
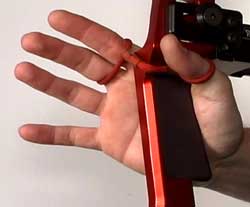
And since you don’t want to catch the bow, I recommend using a bow sling. This will allow you to shoot with a relaxed, open hand and let the sling catch the bow. Many indoor, FITA and field tournament shooters use finger slings because they really allow you to let the bow jump out of your hand. (See PHOTO D.)
Unfortunately, finger slings are not practical for bowhunting. So, I use a modified ‘real finger sling’ while hunting. Here’s how it works:
When you grip the bow lightly touch your index finger to your thumb and let these two fingers, and only these two fingers, catch the bow after the shot. The trick here is keeping the rest of your hand and fingers relaxed. If you practice with a finger sling enough this will become quite natural. (See PHOTO E.)
I hope you’ll give what I’ve presented here a chance. If you’re like most of the people I’ve taught these techniques to you should see a noticeable difference in your shooting fairly quickly. One way to tell you’ve learned my lesson well is the watch the bow, especially the stabilizer, at the moment of the shot. If it jumps straight forward then it means there’s no torque on the bow and you’re doing things right. Good Hunting!!!