The Field Setup
In this lesson we teach you how to properly set up for video footage, both the equipment and the hunting setup. We will teach you the pros and cons of close vs. far setups and show you some videos to demonstrate these techniques. This section gives you everything you need to know (prior) to seeing any animals.
Treestand Setups
When setting up for a treestand video shot there are a number of things to keep in mind:
- Open terrain is best. It gives you time to see them coming and get ready. Extremely thick terrain is difficult to capture a kill shot. When you are choosing a hunt specifically for filming try to find an area where the deer (elk, bear, etc) will give you time to prepare. It also makes for more compelling video footage since you can build viewer drama by watching the game approaching from a distance.
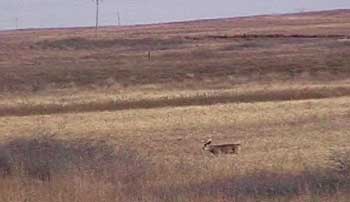 |
| Open Terrain is Best - This buck gives you plenty of time to see him coming and prepare. |
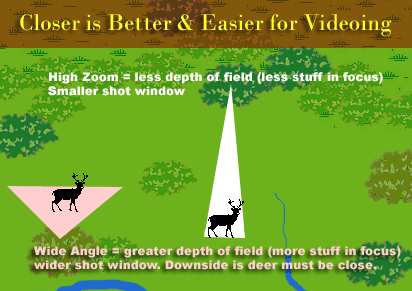
- Closer shots are better - A close shot allows you to set the lens on your video camera to wide angle, that will give you more time to shoot and produced a better quality scene than one that is zoomed in. Wide angle also allows you more depth of field for focus. A zoomed in lens will require focusing if the deer moves a few yards closer or further than your focusing distance - assuming you are using manual focus which we always recommend.
- Understand Framing and preparing ahead of time for the shot - The first thing I do once in the stand (sometimes before I'm in the stand) is to frame the scene by picking out landmarks for shots. Understand where the edges of your shot are (see photo below) and prepare for this before the deer shows up. If you are on a guided/outfitted hunt, or if you know the area ahead of time, you should know trails, direction of travel, and any features like scrapes, food source, etc.
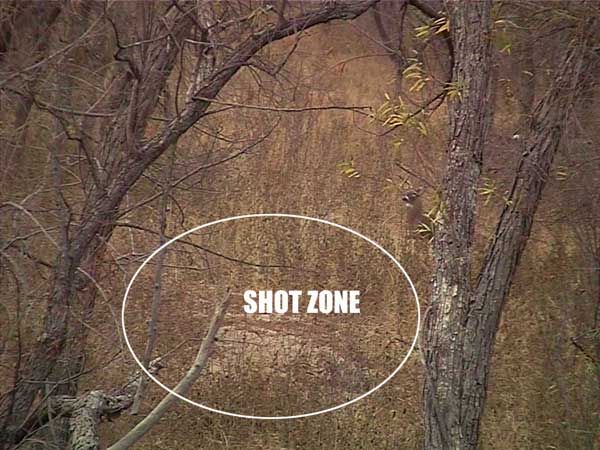 |
| Know your Shot Zone - In this photo, taken directly from a video clip, we framed the scene so the deer would walk into the shot zone. In this case, the deer never did go through this zone. If we wanted to shoot this deer on video he never gave us the opportunity. |
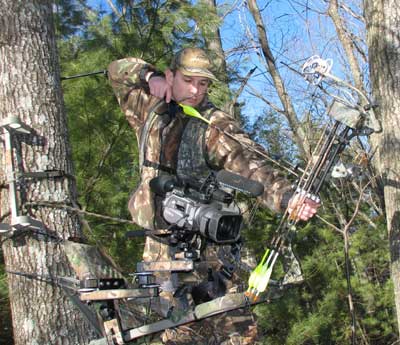
- Right handed shooters should always have the camera off their right leg. The opposite is true for left-handed shooters. Since you can't operate the camera with the same arm holding the bow, this is just common sense. Actually, one more point is that release shooters have a disadvantage over finger shooters. Finger shooters can move their hand freely between the string and the camera while release shooters need to clip onto the string each time which will slow you down.
- The Camera should be as close to your hand as possible. Try not to reach for the arm, it should be right there. This helps for both a seated and a standing shot. For example, in the below photos, the camera is handy for either position. I prefer a standing shot always but the deer doesn't always cooperate.
- Use of a remote device - If you have a remote device, clip it to your right thigh (left thigh for left handed shooters). I find the thigh strap on my SOP harness to be the ideal location to clip to. You can also clip it to the extension arm on your video bracket. Just make sure it is handy without excessive movement.
 |
 |
| Proper Camera Position - Camera position is critical to successful videoing. You need to make sure the camera is not in the way of your shot, however it must be conveniently located within easy reach of your drawing hand. |
Watch a video of my setup procedure in the treestand
Ground Blind Setups
Ground blind setups are much easier to video for most scenarios. But they have one big disadvantage over a treestand - you usually can't see them coming. But the benefit is the freedom of movement within the blind more than makes up for it when they do show up. For a turkey hunt you will likely know where the birds will come from, or you can help direct the action with decoys. This gives you time to move the entire tripod (worst case) or pan the camera (best case) inside the blind. Remember to practice the movement quietly before an actual hunt. You will likely have lots of down-time during your hunt and you can use that to practice.
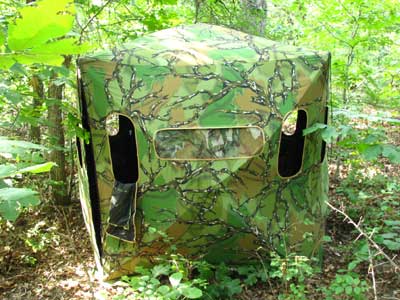 |
| Ground Blinds - Like this one from Double Bull Archery makes videoing easy. The camera simply sits on a tripod from either a different window or at the bottom of your shooting window. In some cases I will cut video slots into the fabric of the blind. |
 |
Video Clip Example from a Ground blind
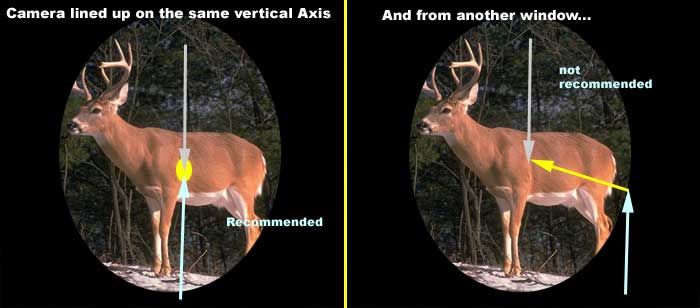
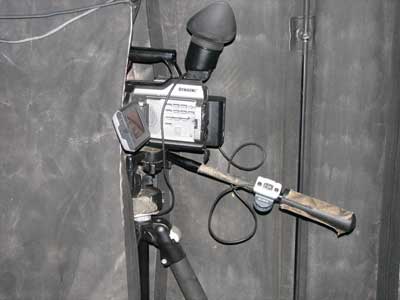
For ground blind setups I always use a small tripod that can be placed underneath my shooting window. If your blind has low video windows you are in luck, otherwise don’t be afraid to cut them in. I prefer to make my bowshot, and video from the same vertical plane. This gives a more dramatic effect of following the arrow. However, on some blinds this is not possible. Double Bull Blinds are terrific to shoot from, I've filmed and killed a bunch of birds out of them. I've also filmed several deer from ground blinds but never killed a deer from one. Now Hogs? That's a different story...
|
| More Dramatic Shots - to give the viewer the feeling they are right there behind the bow, we try to line up our camera as close as possible to the vertical axis of the arrow path. This is tough from a treestand, but quite doable from a ground blind. |
Stalking Setups
While there are some options available for bow-mounted cams, helmet cams, etc. I have never used them and the footage I’ve seen from them have been cheesy at best – in my opinion. So we need to assume that you will be attempting to video yourself using a tripod, or more than likely, using a guide or a cameraman. Those techniques are out of scope for these lessons.
But here are some tips for videoing your own stalk:
- Carry a tripod and hit record just as you are ready to shoot. This is extremely difficult and should only be used when you absolutely don't care about blowing 90% of your stalks trying to catch it on video.
- Stalk the animal until you get close enough to head him off in an ambush. Get out in front of him and then set up the camera. It is difficult but doable if the footage is a priority for you. Again, you will be frustrated more times than not. I have never successfully pulled this off and in most cases don't bother.
Lesson 4 - How to Shoot and Film Simultaneously
|